Hello everyone, I continue to master the Groovy language, it is not easy of course, but the setting of tasks and a great desire oblige, today from interesting and curious tasks is exporting JSON to a csv file, I am very glad if I helped someone in solving it, the code is below:
Hello everyone, due to the current life circumstances, I have to master not just new technologies and platforms, so I am starting my journey by mastering new platforms for me, JIRA and Confluence, and accordingly I will also master the languages and frameworks JAVA, Groovy, Grails. In this post, I will give examples of calling the JIRA API using C# and Groovy, and then it will get even more interesting.
C# (example):
Sample code to read documents from desired folder in library and download locally to disk.
To work with C#(CSOM), use namespace (reference) Microsoft.SharePoint.Client.
static void Main(string[] args)
        {
            ClientContext cxt = new ClientContext("http://sp-test/sites/test");
            List list = cxt.Web.Lists.GetByTitle("Documents");
            cxt.Load(list);
            cxt.Load(list.RootFolder);
            cxt.Load(list.RootFolder.Folders);
            cxt.Load(list.RootFolder.Files);
            cxt.ExecuteQuery();
            FolderCollection folders = list.RootFolder.Folders;
            foreach (Folder folder in folders)
            {
                if ((folder.Name != "Forms")&(folder.Name == "Special Documents"))
                {
                    cxt.Load(folder.Files);
                    cxt.ExecuteQuery();
                    FileCollection fileCol = folder.Files;

                    foreach (Microsoft.SharePoint.Client.File file in fileCol)
                    {
                        string ServerRelativeUrl = file.ServerRelativeUrl;
                        DownloadFiles(ServerRelativeUrl);
                    }
                }
            }
        }
        public static void DownloadFiles(string ServerRelativeUrl)
        {
            ClientContext clientContext = new ClientContext("http://sp-test/sites/test");
            Web web = clientContext.Web;
            Microsoft.SharePoint.Client.File filetoDownload = web.GetFileByServerRelativeUrl(ServerRelativeUrl);
            clientContext.Load(filetoDownload);
            clientContext.ExecuteQuery();
            var fileRef = filetoDownload.ServerRelativeUrl;
            var fileInfo = Microsoft.SharePoint.Client.File.OpenBinaryDirect(clientContext, fileRef);
            var fileName = Path.Combine(@"C:\Temp\Document", (string)filetoDownload.Name);

            using (var fileStream = System.IO.File.Create(fileName))
            {
                fileInfo.Stream.CopyTo(fileStream);
            }
        }
And again we return to the questions of the forum, where the audit of the SharePoint server was discussed, in which it was necessary to output information to the file about the file name, user, duration and events.
A question was created on the forum, where it was necessary to export the elements of 2 lists, the data of which must be displayed in one file (csv) using PowerShell.
Hello to everyone who follows my blog and today again raised the issue of the lack of functionality in the Workflow of the MS SharePoint server, which is created using the MS SharePoint Designer. On the forum, the user created a question in which he wanted, subject to the creation, modification of a list item, etc., so that a text document in the library was created, filled with the contents (column values) of this list item.
The user tried to do this using the standard workflow tools, but faced the fact that the file created in this way could not be filled in, the user also tried to run Javascript using the Workflow, which is basically impossible. And I advised him to use the Event Receiver in this case it is the best solution. How to create an Event Receiver in his articles has already been described, for those who are interested, follow the link.
So, we create an Event Receiver, select the action at which our event "item was added" will be triggered, and add the code where we call the current list item (getlistitem), create variables, a text file in the Temp folder, add Unicode support for your language, fill the file with data, add it to the document library and delete the temporary text file.
using System;
using System.IO;
using System.Text;
using Microsoft.SharePoint;

namespace EventRecieverTest.EventReceiverTestList
{
    public class EventReceiverTestList : SPItemEventReceiver
    {
        public override void ItemAdded(SPItemEventProperties properties)
        {
            using (SPWeb web = properties.OpenWeb())
            {
                try
                {
                    //getcurrentitem
                    SPListItem currentItem = properties.ListItem;
                    //create variable
                    string title = currentItem["Title"].ToString();
                    string server = currentItem["Server"].ToString();
                    DateTime Created = DateTime.Parse(currentItem["Created"].ToString());
                    //create text file
                    string path = @"C:\Temp\" + title + ".txt";
                    //add to Encoding
                    Encoding encoding = Encoding.GetEncoding("UTF-8");
                    if (!File.Exists(path))
                    {
                        using (FileStream fs = new FileStream(path, FileMode.CreateNew))
                        {
                            using (StreamWriter writer = new StreamWriter(fs, encoding))
                            {
                                writer.WriteLine("Наименование: " + title);
                                writer.WriteLine("Сервер: " + server);
                                writer.WriteLine("Дата создания: " + Created);
                                writer.Close();
                            }
                        }
                        //Add file to library
                        SPList lib_destination = (SPDocumentLibrary)web.Lists["Shared Documents"];
                        var targetFolder = lib_destination.RootFolder;
                        var fileContent = File.ReadAllBytes(path);
                        var fileUrl = Path.GetFileName(path);
                        targetFolder.Files.Add(fileUrl, fileContent);
                        //remove cash file
                        File.Delete(path);
                    }
                }
                catch (Exception ex)
                {
                    File.WriteAllText(@"C:\Temp\error.txt", ex.ToString());
                }
            }
        }
    }
}
1. We check, go to the "Test" list, create a list item, where we fill in our column data and save the list item.
2. Go to the document library and see our created text file.
3. We open the file and look at its contents, everything matches.
Due to the closure of "the blog TechNet" I transfer all my articles in the blog :)
To delete a fixed number of items in the list of WSS, SharePoint server without putting them in the Recycle Bin, this is very convenient, since the cleaning of the Recycle Bin takes a certain amount of time for the Site Collection Administrator.
This script is easy to use after the migration or backup of the lists / libraries in which you need to delete a certain number of items.
Pre-requisites:
1.PowerShell 2.0 and higher
2.WSS or SharePoint server 2007, 2010, 2013, 2016, 2019.
Due to the closure of "the blog TechNet" I transfer all my articles in the blog :)
When developing a new project, I needed to download the data from the MS SharePoint list to the MS SQL Server table, where I used C#(CSOM).
This code is preferable for me, flexible and not too resource-intensive, as a rule I use it for events by Custom Timer Job, but I am also sure that he is approaching the example and for Event Reciever and other opportunities. To work with C#(CSOM), use namespace (reference) Microsoft.SharePoint.Client.
ClientContext context = new ClientContext("http://sp/sites/test");
Web web = context.Web;
List list = context.Web.Lists.GetByTitle("DataList");
context.Load(list);
context.ExecuteQuery();
CamlQuery query = new CamlQuery();
query.ViewXml = "";
ListItemCollection allitems = list.GetItems(query);
context.Load(allitems);
context.ExecuteQuery();
SqlConnection cn = new SqlConnection();
DataSet EmpDataSet = new DataSet();
SqlDataAdapter da;
cn.ConnectionString = @"Data Source=SQLServer;Initial Catalog=DataTable;Integrated Security=SSPI";
cn.Open();
da = new SqlDataAdapter("select * from [dbo].[Table_Data]", cn);
SqlCommandBuilder builder = new SqlCommandBuilder(da);
da.Fill(EmpDataSet, "Table_Data");
DataTable table = EmpDataSet.Tables[0];
foreach (ListItem listitem in allitems)
{
    DataRow row = table.NewRow();
    row["Date"] = System.TimeZone.CurrentTimeZone.ToLocalTime(Convert.ToDateTime(listitem["Created"].ToString()));
    row["Column1"] = listitem["Title"].ToString();
    row["Column2"] = listitem["Event1"].ToString();
    row["Author"] = listitem["AuthorPosition"].ToString();
    row["DateToday"] = System.TimeZone.CurrentTimeZone.ToLocalTime(Convert.ToDateTime(listitem["Today"].ToString()));
    table.Rows.Add(row);
    builder.GetInsertCommand();
}
da.Update(EmpDataSet, "Table_Data");
Due to the closure of "the blog TechNet" I transfer all my articles in the blog :)
You could add JQuery to obtain and display document size into your custom search display template. The code below is about how to show document size beside the document name of all documents uploaded into a SharePoint document library.
You could use the function in the code that obtaining the file size depend on the URL of the document.
You must have the rights to Design web part.
Pre-requisites
SharePoint server 2010, 2013, 2016, 2019.
<script type="text/javascript" src="http://code.jquery.com/jquery-1.11.3.min.js"></script>
<script type="text/javascript">
function hdrDetails(i, elm, cl) {
    cl = cl/1024;  //divide content-length by 1024 (KB)
    var sz = cl>1024?"MB":"KB";  //if cl is still big, set to MB
    cl = cl>1024?cl/1024:cl;  //if cl is still big, divide again
    var len = $(elm).eq(i).text().length;  //check the link's text length
    if(len > 0) {
        //add a file size
        $(elm).eq(i).after(" (" + cl.toFixed(2) + " " + sz + ")");
    }
}
$(function() {
    var elm="a[href$='.pdf'],"+ //only the file types we want
	"a[href$='.doc'],"+
	"a[href$='.ppt'],"+
	"a[href$='.xls'],"+
	"a[href$='.docx'],"+
	"a[href$='.pptx'],"+
	"a[href$='.mht'],"+
	"a[href$='.xlsx']";
    $(elm).each(function(i, e) {
        if (e.hostname && e.hostname == location.hostname) {
            $.ajax({
                type: "get",
                url: $(this).attr("href"),
                complete: function(xhr, textStatus) {
                    var cl=xhr.getResponseHeader("content-length");
                    hdrDetails(i, elm, cl); //call the calculation fn
                }
            });
        }
    });
});
</script>
Due to the closure of "the blog TechNet" I transfer all my articles in the blog :)
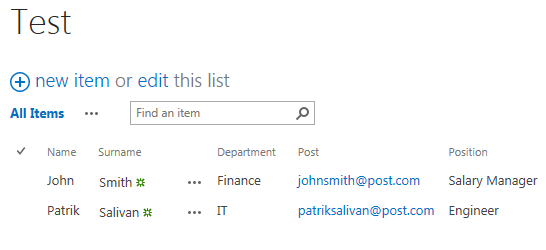
There are always non-standard tasks in MS SharePoint server, one of such tasks is the export of data from the file (txt, csv) to the SharePoint list using C# to the example in the Event Receiver. Do not forget, when using the data array 'split' string [] arr = line.Split (';') specify a character that separates the values of your array.
Demonstration, download the link above:
1.CSV-file:
2.Code C#:
using Microsoft.SharePoint;
using System;

namespace EventDeployTest2.EventReceiver2
{
    public class EventReceiver2 : SPItemEventReceiver
    {
        public override void ItemUpdated(SPItemEventProperties properties)
        {
            using (SPSite oSPsite = new SPSite("http://sharepoint/sites/test"))
            {
                using (SPWeb oSPWeb = oSPsite.OpenWeb())
                {
                    SPList list = oSPWeb.Lists["Test"];
                    string[] lines = System.IO.File.ReadAllLines(@"\\sharepoint\sites\test\SiteAssets\user.csv");
                    SPListItem itemToAdd = null;
                    foreach (string line in lines)
                    {
                        string[] arr = line.Split(';');
                        itemToAdd = list.Items.Add();
                        itemToAdd["Name"] = Convert.ToString(arr[0]);
                        itemToAdd["Surname"] = Convert.ToString(arr[1]);
                        itemToAdd["Department"] = Convert.ToString(arr[2]);
                        itemToAdd["Post"] = Convert.ToString(arr[3]);
                        itemToAdd["Position"] = Convert.ToString(arr[4]);
                        itemToAdd.Update();
                    }
                }
            }
        }
    }
}
Due to the closure of "the blog TechNet" I transfer all my articles in the blog :)
When you check in a document, you can add a brief comment about the changes you made. This is a great way for others to see a summary of your edits. If you ever need to edit a comment you can check out the document again, immediately check it back in, select Overwrite the current version, and then add the new comment in the Comment box.
This article shows how to use the REST API to load a last value from the "Check In comment" field in the document library.
Pre-requisites
1.SharePoint server 2013, 2016, 2019.
2.Editor for working with Javascript files.
window.onload= function(){
    // getting the GUID of list.
    var listGUID = _spPageContextInfo.pageListId;
    // getting the item id
    var itemId = '1';
    // clearing the value inside the tdCheckInComment
    $("#tdCheckInComment").html('');
    // checking if list guid found or not.
    if(listGUID)
    {
        //removing {} from the variable.
        listGUID = listGUID.replace(/[{}]/g, "");
        // checkin if item id is found or not.
        if(itemId)
        {
            var comment = GetLastCheckInComment(listGUID,itemId);
            if(comment)
            {
                $("#tdCheckInComment").html(comment);
            }
        }
    }
}
function GetLastCheckInComment(listGUID,itemId) {
    var returnValue;
    try {
        jQuery.ajax({
            url: _spPageContextInfo.webAbsoluteUrl + "/_api/web/lists(guid'" + listGUID + "')/items(" + itemId + ")/File/CheckInComment",
            type: "GET",
            async: false,
            headers: { "Accept": "application/json;odata=verbose" },
            success: function (data, textStatus, xhr) {
                returnValue = data.d.CheckInComment;
            },
            error: function (data, textStatus, xhr) {
                console.error('Error while getting the last check in comment.');
            }
        });
    }
    catch (ex) {
    }
    return returnValue;
}
<table>
<tr>
    <th><label id="lblComment">Comment:  </label></th>
    <td id="tdCheckInComment"></td>
</tr>
</table>
Due to the closure of "the blog TechNet" I transfer all my articles in the blog :)
If you need to reset the list item ID, for example to the number "1" or the library in SharePoint, then you can use
PowerShell and access the WSS_Content database to the required lists or library, for this we need to know the
GUID list or library, example through SharePoint Designer.
Pre-requisites:
1. PowerShell 2.0 and higher,
2. WSS or SharePoint server 2007, 2010, 2013, 2016, 2019,
3. SharePoint Designer,
4. SQL Management studio.
Due to the closure of "the blog TechNet" I transfer all my articles in the blog :)
If you need to download information from the MS SQL server table to the list on the SharePoint server, use PowerShell.
In this code, you connect to the database using SSPI and operate with standard T-SQL commands, then connect to the SharePoint list and upload the data.
Pre-requisites
1. PowerShell 2.0 and higher,
2. WSS or SharePoint server on-premises 2007, 2010, 2013, 2016, 2019.
3. SQL management studio (only view).
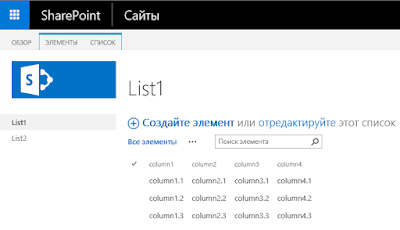
In this article, I will show a simple example of how to separate the date and time string of list items, using the "example " of one of the ask in the MSDN forum.
(function() {
        var linkFilenameFiledContext = {};
        linkFilenameFiledContext.Templates = {};
        linkFilenameFiledContext.Templates.Fields = {
            "Date": { "View": linkFilenameFiledTemplate }
        };
            SPClientTemplates.TemplateManager.RegisterTemplateOverrides(linkFilenameFiledContext);
    })();

    function linkFilenameFiledTemplate(ctx) {
        var currentdate = ctx.CurrentItem["Date"];
        if (currentdate != "") {
        var date = currentdate.toString().substring(currentdate.lastIndexOf(" "), - 1);
        var time = currentdate.toString().substring(currentdate.lastIndexOf(" ") + 1);
        return date + "<br>" + time;
        }
    }
In this article I’ll give an example of how to use REST API and JSlink to make a request to attachments in list items which will be useful for working with current and future development projects on the MS SharePoint server (2013, 2016, 2019, Online) platform.
function AttachmentFiledTemplate(ctx){
    var listItem = ctx.CurrentItem;
    var listTitle = ctx.ListTitle;
    var spHostUrl = ctx.HttpRoot;
    var itemId = listItem.ID;
    context = ctx;
    var queryUrl = spHostUrl + "/_api/web/lists/getbytitle('" + listTitle + "')/items('" + itemId + "')/AttachmentFiles";
    $.ajax({
    url: queryUrl,
        headers: {
            "accept": "application/json; odata=verbose",
        },
        method: "GET",
         success: function(data){
            $.each(data.d.results, function(){
                //url attachments in list Items
                var attachmenturl = this.ServerRelativeUrl;
                console.log(attachmenturl);
            })
        },
        error: function ajaxError(response){
        alert(response.status + ' ' + response.statusText);
        }
    });
}
We implement using the REST API the name of the attached files in the list items (Example):
(function () {
    var linkFiledContext = {};
    linkFiledContext.Templates = {};
    linkFiledContext.Templates.Fields = {
        "Attachments": { "View": AttachmentsFiledTemplate }
    };
    SPClientTemplates.TemplateManager.RegisterTemplateOverrides(linkFiledContext);

})();

function AttachmentsFiledTemplate(ctx) {
    var itemId = ctx.CurrentItem.ID;
    var listName = ctx.ListTitle;
    return getAttachments(listName, itemId);
}

function getAttachments(listName,itemId) {
    var url = _spPageContextInfo.webAbsoluteUrl;
    var requestUri = url + "/_api/web/lists/getbytitle('" + listName + "')/items(" + itemId + ")/AttachmentFiles";
    var str = "";
    $.ajax({
        url: requestUri,
        type: "GET",
        headers: { "ACCEPT": "application/json;odata=verbose" },
        async: false,
        success: function (data) {
            for (var i = 0; i < data.d.results.length; i++) {
                str += "<a href='" + data.d.results[i].ServerRelativeUrl + "'>" + data.d.results[i].FileName + "</a>";
                if (i != data.d.results.length - 1) {
                    str += "<br/>";
                }
            }
        },
        error: function (err) {
        }
    });
    return str;
}
Hello everyone, let's talk about the error that comes out after adding a new assembly to the project, for example via NuGet Package in Visual studio (Template Project: SharePoint 2016 - Visual Web Part).
Let's go step by step:
1. Open Visual studio on MS SharePoint server 2016 (On-Premises) and create new project - SharePoint 2016 - Visual Web Part,
2. Add to URL and choise "Deploy as a farm solution",
3. Add simple code (example: if (!IsPostBack) {//your simple code}) in the void Page_Load,
4. Further we need to add assembly (example: "TemplateEngine.Docx") for the project in NuGet Package -> "Tools" -> "NuGet Package manager" -> "Package manager Console", -> "Install-Package TemplateEngine.Docx -Version 1.1.4",
5. We are convinced that the assembly was added and displayed in "Reference", add simple code to example and weel see is not errors in "Error List".
6. "Build" -> "Rebuild Solution" -> "Deploy Solution".
7. Add our solution in the Page and weel see the next error:
This behavior at first glance seems strange, we added the assembly through the NuGet Package console, it would seem that when adding the assembly, it is registered in the Reference and then in all the project properties. But the error that the assembly file is missing is still there. So how to fix it quickly and most importantly correctly, again we go step by step:
1. In our project there is folder "Package" in which there is file "Package.package" a file associated with Features, where the paths for assemblies in the current project are contained, open it and immediately go to the "Advanced" tab and "Add Existing Assembly":
2. The "Add Existing Assembly" window has opened, where you can add the assembly, follow the path to our project to the \bin\Debug folder and find our assembly - "TemplateEngine.Docx.dll".
3. Choose "WebApplication" and add new item in "Safe Control": "Namespace": TemplateEngine.Docx.dll, "Assembly Name": TemplateEngine.Docx.dll.
4. We see our record and again collect our project and publish it on the server: "Build" -> "Rebuild Solution" -> "Deploy Solution".
using System;
using System.Linq;
using Microsoft.SharePoint;

namespace ConsoleApplication
{
    class Program
    {
        static void Main(string[] args)
        {
            string userName = "DOMAIN\\user";
            string groupName = "Home Members";
            using (SPSite Site = new SPSite("http://sp"))
            {
                using (SPWeb Web = Site.OpenWeb())
                {
                    SPUser user = Web.EnsureUser(userName);
                    if (user.Groups.Cast().Any(g => g.Name.Equals(groupName)))
                    {
                        Console.WriteLine("User " + userName + " is a member of group " + groupName);
                    }
                    else
                    {
                        Console.WriteLine("User " + userName + " is NOT a member of group " + groupName);
                    }
                }
            }
        }
    }
}
The example is excellent, in the end we will write "bool" using "ToUpper()", which at the machine level works much faster, because Microsoft optimized it:
In the previous article, I described how to create a document and attach it to a list item when creating it, this time I will focus on finding words within a document, since At the moment I am working on the implementation of my own project for searching the library of keywords within documents. To work with documents Word and Excel I use DocumentFormat.OpenXml and to work with pdf I use TallComponents.PDFKit.
Why? Because MS SharePoint server keeps source files (documents) on the server, but in the client part we work with a copy of the document. I will give 4 code examples for MS Word (doc, docx), Excel (xls, xlsx), Pdf and Txt. I hope these examples will help you in the future in your projects.
Hello everyone, this time I will talk about creating Event Reciever and actions that will occur with the element of the list, we are talking about reading the properties of the list item, creating the Word document, filling it with these properties of the current list element and attaching it to an attachment to this element of the list while creating. Such a task came to mind non-monotonously, it was set by user asked it on the forum, I thought that in future project it was possible, and I myself wanted to broaden my horizons in this topic. In this project, to create a document and its content, I will use DocumentFormat.OpenXml and a description of this library I will use the blog Create a word document with OpenXml and C# (by Ludovic Perrichon).
So begin!!!
1. Create is a Custom list (name "ListProject") then modify list view and show column "Created", "Created by", "Modified", "Modified by".
2.List is ready, then open Visual studio and click "New project" choose project depending on your version SharePoint On-Premises "SharePoint -(2010, 2013, 2016) Empty Project" project name "ItemUploadAttachments".
3. Set URL and Select a Farm Solution.
4. Click right-click on the project name and click "Add" then "New item" and choose "Event Reciever" is name "UploadAttachments".
5. And will see Event Reciever Settings then choose event source "Custom List" and click handle events only "An item was added". Click Finish.
6. Open is added in project Event Reciever "UploadAttachments" and you will see "Elements.xml" open and edit file, set to comment or remove row "<Receivers ListTemplateId="101">" and add "<Receivers ListUrl="Lists/ListProject">", then save file.
7. Open DocumentFormat.OpenXml and insert last version to nuget package "Install-Package DocumentFormat.OpenXml -Version 2.9.0".
8. We continue to work with Event Reciever open file "UploadAttachments.cs" and will see code "public override void ItemAdded(SPItemEventProperties properties) {}" this will be our event, which is activated when creating a list item. Add the code of this void "ItemAdded".
9. Further, beyond the limits of this method, we create a public static void "CreateWordprocessingDocument"
public static void CreateWordprocessingDocument(string filepath, string Title, string Author, DateTime Created, string Modified, DateTime EndTime)
        {
        using (WordprocessingDocument wordDocument = WordprocessingDocument.Create(filepath, WordprocessingDocumentType.Document))
            {
                MainDocumentPart mainPart = wordDocument.AddMainDocumentPart();
                mainPart.Document = new Document();
                Body body = mainPart.Document.AppendChild(new Body());
                Paragraph para = body.AppendChild(new Paragraph());
                Run run = para.AppendChild(new Run());
                if (Author != "")
                    run.AppendChild(new Text("Author: " + Author));
                {
                    if (Created != null)
                    {
                        Paragraph p = new Paragraph();
                        Run r = new Run();
                        RunProperties rp2 = new RunProperties();
                        rp2.Italic = new Italic();
                        rp2.Bold = new Bold();
                        r.Append(rp2);
                        Text t = new Text("Date created: " + Created) { Space = SpaceProcessingModeValues.Preserve };
                        r.Append(t);
                        p.Append(r);
                        body.Append(p);
                    }
                    if (Modified != "")
                    {
                        Paragraph p = new Paragraph();
                        Run r = new Run();
                        Text t = new Text("Editor: " + Modified);
                        r.Append(t);
                        p.Append(r);
                        body.Append(p);
                    }
                    if (EndTime != null)
                    {
                        Paragraph p = new Paragraph();
                        Run r = new Run();
                        RunProperties rp2 = new RunProperties();
                        rp2.Bold = new Bold();
                        r.Append(rp2);
                        Text t = new Text("Date Modified: " + EndTime);
                        r.Append(t);
                        p.Append(r);
                        body.Append(p);
                    }
                }
            }
        }
10. Check our project is not error, Build solution and Deploy solution. Open our list "ListProject" then "New item" and check in attachment to this item.